The 7th Armoured Division heads
for
Villers-Bocage
The ‘Right Hook’ to Villers-Bocage was given, in first instance,
to the 131st Infantry Brigade with the 1st Royal Tank Regiment as support. They would
march through the lines of the 56th Infantry Brigade, from Tilly-sur-Seulles to Villers-Bocage. But,
because of the bad terrain and the slow progress, the order was put forward to the 22nd
Armoured Brigade Group of the 7th Armoured Division on the left flank. They had to move
south into the gap between the British and American sector. Head of the column consisted
of the 4th County of London Yeomanry (Sharpshooters) and as reconnaissance unit the 8th
and 11th Hussars Regiment.

A Stuart V (M3A3) of the 7th
Armoured Division in the Bocage on 15 June, 1944
Around 16.00 hours on 12 June, the column moved out of
Saint-Paul-du-Vernay onto the D 99. The road was small, but good enough. Problem was
the bocage, the infamous Normandy hedges, it was thick and could conceal German armour.
Cahagnolles was quickly reached and St.Honorine-de-Ducy was also liberated by the units of the 7th Armoured Division.

In St.Honorine-de-Ducy a plaque is to be found
for the liberation on 12 June 1944
After 7 kilometres, near Livry, the column came under fire of a German anti-tank
gun belonging to Panzer Lehr Division. This put a Cromwell tank out of action.
A decision was made to attack this threat head on. They could outflank to the
west but this was time consuming and was moving through the American sector, around
through the east could mean more German opposition. At 20.00 hours the German position
at Livry was cleaned up by a small unit of the 1st Rifle Brigade. Brigadier Hinde decided
to halt for the night. Around midnight the column was finally placed in a strategic
position beside the D115, a sector known as la Mulotičre. During a reconnaissance on the
left flank, a squadron of 8th Hussars made a brief contact with Germans and two Cromwell tanka were lost.

The night was without further events but a steady rain was falling. The next day,
13 June, around 05.30 hours, the first vehicles moved onto the D115 heading Briquessard.
4th County of London Yeomanry (CLY) was taking first lead again with the 8th and 11th
Hussars protecting the axle and the flanks. The officers complained that they moved too fast.
But they also knew that speed was the essence to reach as fast as possible ‘Point 213’,
a hill east of Villers-Bocage. Just as the head of the column reached Villers-Bocage, Lt.
Charles W. Pearce of the 4th RHQ (Regimental Headquarters) discovered a German recce vehicle
in an apple orchard. Through his binoculars he could see the German commander observing the
British column. Knowing that it was obvious to the German where the column was heading,
he called out to the Cromwell behind him. But Major Carr, who had the command of this Cromwell,
reported that the turret was stuck because of the overload of supplies. Pearce broke radiosilence
and gave the order to the next Cromwell in line to destroy the target. But again, nothing
happened and moments later Pearce observed how the German vehicle pulled away and disappeared.
The first British vehicles moved into Villers-Bocage. RHQ Troop stopped on the east side of
town together with three M3A3 Stuart tanks of the Reconnaissance Troop, 4th CLY just as it was
leaving Villers-Bocage. A Squadron drove on to ‘Point 213’ with nine Cromwell’s, three Sherman
Fireflies and a couple of Half Tracks followed by vehicles of the 1st Rifle Brigade, A Company.

The Cromwell of Sergeant-Major Gerald
Holloway
(this Cromwell was later put out of action in Villers-Bocage)
When A Squadron reached the top of ‘Point 213’ all of the commanders of
A Company, 1st Rifle Brigade were summoned to come above for new orders. A Half Track
collected the officers. But it was realised that this was a target of opportunity,
so all the officers were divided over two extra vehicles. When this was all going on,
the column came to a standstill. Troop commander, Lt. Bill Garnett in the Cromwell
up front, spotted an approaching German staff vehicle. He shot at it with his machinegun.
The vehicle spun off the road into the field where it crashed and burned.
The vehicles were moved into the soft shoulders of the road, for better position and
to make room for the approaching officers. Some of the men came out of their tanks and started
to make their morning tea.
The Tiger versus the
rest
While the British column, with their engines running, were waiting on the RN175
(now the D 675) of ‘Point 213’, six Tiger tanks of 2.
Kompanie Schwere SS Panzer Abteilung 101, under command of SS-Obersturmführer Michael
Wittmann, stood hidden in a field. They had arrived there, the day before, during the evening.
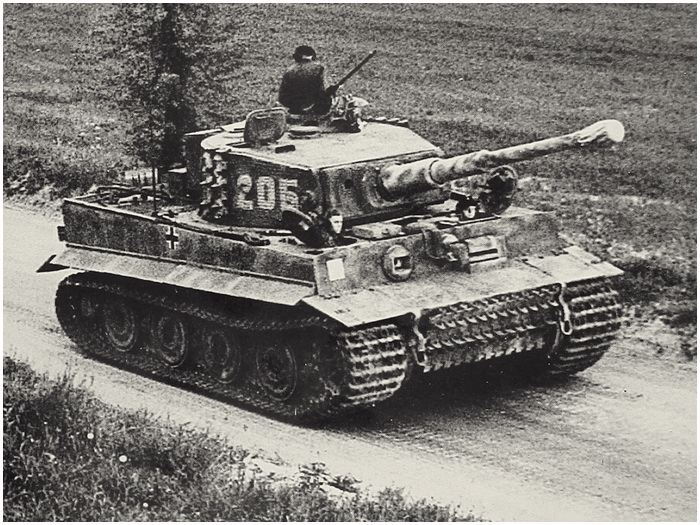
The Tiger '205' of SS-Obersturmführer
Michael Wittmann,
it is on it’s way from the north of France to Normandy
A Wehrmachtsunteroffizier warned Wittmann and he saw to his surprise an endless column
of British vehicles. He hesitated not a moment and climbed into the first Tiger
available, the ‘234’ from SS-Uscha. Herbert Stief (Wittmann's own, the ‘205’, was under
repair because of engine problems, just as ‘211’ under command of SS-Ostuf. Jürgen Wessel).
After a few meters Wittmann noticed that there was something wrong with ‘234’ and left the
tank and took over the Tiger from SS-Unterscharführer Kurt Sowa (for long the
assumption was that Sowa's Tiger was the ‘222’, but the writer of this article
believes that Sowa was originally operating that day the ‘213’ because the ‘222’ was also in repair).

This is the Tiger '222'. It would
later be used to tug the ‘231’
(More on this in the lager article Villers-Bocage and beyond)
Wittmann ordered the driver to start up the Tiger. Kurt Sowa took over
Tiger ‘234’ from Stief and placed it in a defensive position near the D 675.
The ‘221’ from SS-Ustuf. Georg Hantusch and the ‘233’ from SS-Oscha. Jürgen Brandt moved
out of the shelter and took the parallel road of the D 675 to attack the head of A Squadron
of the 4th County of London Yeomanry. Normally it would be suicide to make such an attempt to
use just three tanks in an attack to a large unit, such as the 4th CLY. But Wittmann knew
what a Tiger could take from an opponent and how much pounding it could deploy. And so, there was suddenly
a huge Tiger coming from a side road of the D 675,… it was around 09.00 hours.
Tour the route of Wittmann
To locate the former shelter of Wittmann and the Tigers, leave
Villers-Bocage and head for the A 84-E 401 to Caen. Do not take the highway, but go
underneath and onto the D 675 heading for Missy. Almost at once the road is climbing
(to ‘Point 213’ ). After a couple of hundred meters you come to the side road on your
right that leads to Montbrocq-la Cidrerie (if you see an electricity station, you have driven
too far). When you take the side road, you will see after 200 meters on your left the
area that was once the shelter. A 50 meters further on is the entrance to the parallel road
of the D 675.

Above; the entrance of the route of the
Tigers '221' and '233', parallel of the D 675
Below: to the right, behind the fence was the shelter of Montbrocq-la Cidrerie,
at
the end of the road lies the D 675, this is the route that Wittmann took

Just before the Tiger of Wittmann turned into the D 675, it was spotted by
Sergeant O’Connor of the 1st Platoon, 1st Rifle Brigade, who reported it at once over
the radio. But the first fired by the Tiger exploded already and hit a Cromwell who was still
being brought into position. A Sherman Firefly was turning her turret towards the Tiger,
but the gunner of the latter fired his gun, hitting the Firefly, which spun over the
road, blocking it. Within seconds two tanks of A Squadron were in flames.

Totally destroyed Half-tracks of the 1st
Rifle Brigade
Wittmann gave the order to go left onto the D 675 towards Villers-Bocage. The whole
road was packed with vehicles. Behind Wittmann, A Squadron of the 4th CLY was stuck
and left them to the other two Tiger commanders. The Tiger from Wittmann
started to shoot at the vehicles of A Company, 1st Rifle Brigade. The Half-tracks were
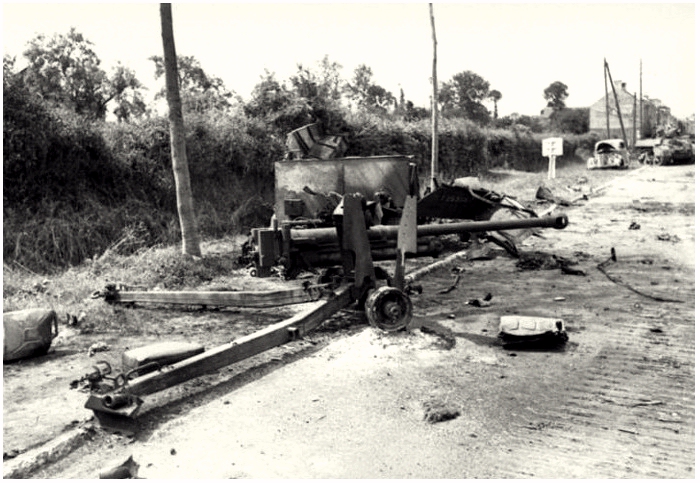
no match to the violence that the 8.8cm gun of the Tiger was deploying. Also
the anti-tank section with their Carriers stood no chance and were, for the time being, unable
to bring their guns into position in order to stop the German tank.

The destroyed anti-tank section on the
D 675 (ex-RN175).
Below the same situation looking towards Villers
(notice the Stuart V, on the right)
On the next page we follow Wittmann with the Tiger into Villers-Bocage where
he continued his onslaught. At the end of that page a link to a short bio can be found
about the person Michael Wittmann.
For a map that contains the route of Wittmann in Villers-Bocage
CLICK HERE
To follow Wittmann into Villers-Bocage click below.
|

