Wittmann moves into Villers-Bocage
When he approached the border of Villers-Bocage, Wittmann noticed three M3A3 Stuart tanks of the
Reconnaissance Troop, 4th CLY. Within a short time these were also put out
of action. Their 37mm gun was no match for the armour and the 8,8cm gun of the Tiger.
The one in the middle completely burned out.
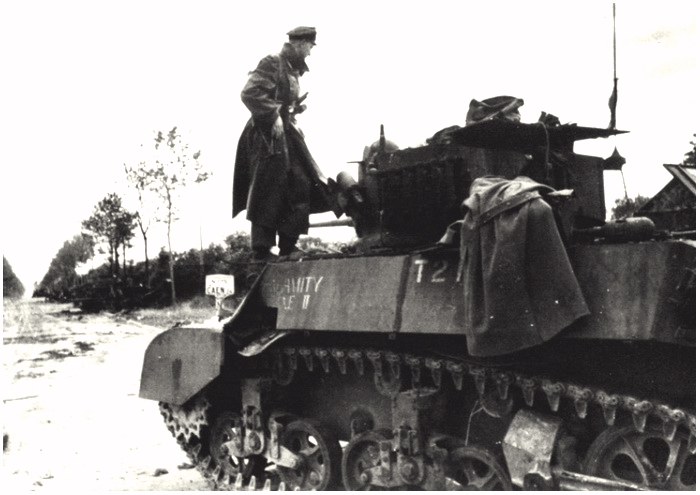
Above: the first destroyed Stuart by Wittmann,
the Calamity Jane II,
is inspected by a German officer.
Below; once again the M3A3
Calamity Jane II, now with sheltering British military
(What is
the story behind this picture?)

Below the second M3A3 Stuart


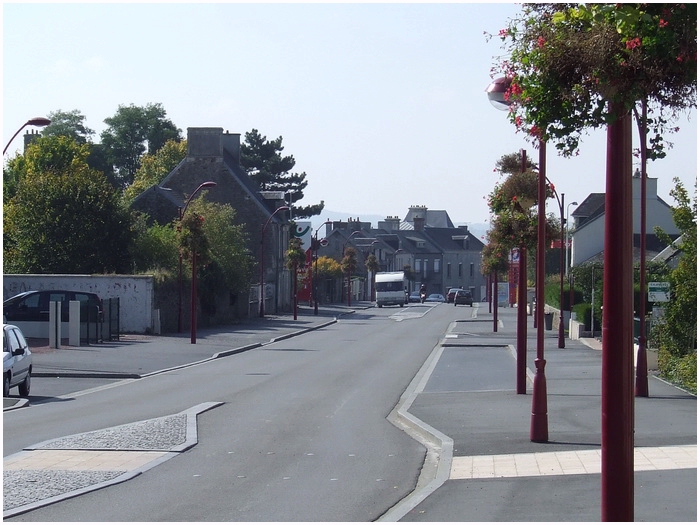
Rue Georges Clemenceau, Then
(June, 1944) and now (2008)
(left stood the third M3A3 Stuart)
Wittmann sends the Tiger into the Rue Georges Clemenceau of
Villers-Bocage. He must have realised that he was making a dangerous manoeuvre. From
the side roads he could expect an anti-tank weapon. But the targets were to good too
pass on them. His next victim was an M5 Half Track of the 4th CLY medical officer.
A short distance from this target stood the vehicles of the Regimental Headquarters (RHQ)
Troop of 4th CLY. The first was the Cromwell tank of Major A. Carr, (the Second-in-Command).
The Cromwell tried, just as all the vehicles in the column to make a turn or to back up. But
the Cromwell was very slow in its rear, and the Cromwell of Carr was hit and stopped in its
tracks. Lt. Charles Pearce (the liaison officer) who was parked in a Scout car behind Carr used
this moment to leave the column and head back through Villers-Bocage, to get help from
B Squadron. He needed a Sherman Firefly.

The crippled Cromwell
(T187692) from Lt. John Cloudsley-Thompson
Meanwhile Wittmann drove in a steady pace down the main road into
Villers-Bocage and pounded every vehicle of RHQ Troop in his sight. Next victim was the
Cromwell of Lt. John Cloudsley-Thompson. The crew was not hurt after the hit and could
leave the tank despite heave machinegun fire. After hiding, they would later reach the British lines.

The knocked out Cromwell
(T187608) from Sergeant-Major Gerald Holloway
Next in line was again a Cromwell, this time T187608 of 4th CLY's
Regimental Sergeant-Major Holloway. He was put out of action at 64 Rue Georges Clemenceau.
Holloway had given the order to back up around a corner, but the slow progress meant the demise of his tank.
Another Cromwell would be next, this one under command of Captain
Pat Dyas, but he managed to back up into a garden. The Tiger from Wittmann rattled
passed him without noticing the Cromwell in the garden. Unfortunately, Dyas could not have
a shot to the side of the Tiger. His gunner had left the Cromwell to relief himself
and did not return when the onslaught began. When Wittmann was passed, Dyas ordered the driver
to follow him so he could have a go at the weak rear of the Tiger.

The knocked out Sherman OP from
Major Dennis Wells
(notice the crater in front of the OP and the hole in the left of the turret)
But Wittmann had no intention to wait for Dyas and moved on to his next
target. This was the Sherman OP (Observation Post) from K Battery, 5th Royal Horse Artillery.
Wittmann fired two armoured piercing shells at the Sherman. The first one smashed just in front of the Sherman,
the second hit the turret on the left. The only one in the Sherman at the time was driver Charles 'Jock' Rae, who was
unhurt after this ordeal. When Rae managed to escape through the escape hatch in the floor of the
Sherman, he was hit by shrapnel below the knee. But Rae managed to return to troops of CLY, were he was treated for his wounds.
The hit in the turret was not necessary, the Sherman OP had no gun,
and was of no danger to the Tiger. To create more space in the turret, the gun was
removed and replaced with a wooden one. The picture above shows how the wooden ‘gun’ has been
blown out of the turret and came to rest in front of the Sherman.

The crippeld OP Cromwell
(T187749) from Captain Paddy Victory
Just behind the Sherman OP was the de 5th RHA Cromwell OP (T187749)
from Captain Paddy manoeuvring in a small side street, the Rue
Curie. He tried to make a neutral turn, but a rock from the road stuck between the drive
sprocket wheel and the track. The Cromwell became a sitting duck and one shot was enough
to knock out the Cromwell and start a fire which consumed the tank.

Wittmann his Tiger stopped near the
Hotel
when he got under fire from the Firefly from Lockwood
After the destruction of the Cromwell OP, the high street Rue Pasteur was
deserted all the way to the end Place Jean d’Arc. Because the street was descending
the horizon was obscured and Wittmann was uncertain what to expect there. Unknown to
Wittmann was that a Sherman Firefly, under command of Sergeant Stan
Lockwood, from B Squadron, had positioned himself and was aiming at the Tiger.
Lockwood observed through the dust and smoke how the Tiger spent his shells
into the OP tanks. He tried a couple of shots on the flash produced by the 8,8cm gun
of the Tiger. But he could not tell for certain if he made any hits, because
of the dust and smoke his own shot had created. He thought he had one hit on the front
near the drivers shield.
Wittmann noticed that he was under fire and decided to end his
‘morning walk’. He ordered two shot on the Firefly and the driver started to retrace
it steps. Out of the smoke suddenly a Cromwell tank was approaching.

Captain Pat Dyas who tried to stop Wittmann
Captain Dyas thought he would see any moment the rearend of the
Tiger penetrating through the smoke. But the first he saw was the 8,8cm gun of
it. According to Dyas he managed to fire two shells which both ricocheted. The 8,8cm
just once barked and the hit to the Cromwell did Dyas flying out of the turret as a cork
from a champagne bottle. As a miracle he was slightly injured and reached B Squadron later,
where he was treated to his wounds.

After the fighting, two panzergrenadiers
have a smoke near the Cromwell of Dyas
(behind it, the Cromwell of RSM Holloway can be seen)
Wittmann, passing the burning and crippled British vehicles,
approached the crossing to Tilly-sur-Seulles. In the short time Wittmann was at work
in Villers-Bocage, Sergeant Bray of A Company, 1st Rifle Brigade with some other men
had managed to bring a 6-pounder ready for action. When the Tiger emerged from
the smoke and dust, the men fired 6-pounder. It hit the steel tracks and the Tiger
came to a standstill. The anti-tank gun was to weak to penetrate the tank itself, but
this shot meant the end of the road of destruction for Wittmann and his crew. Before
the would leave the crippled Tiger, Wittmann lay a barrage of fire round his
immobile bunker. This created a enormous chaos of dust and smoke and the while the
British troops were taking cover, Wittmann and his men made a run for it, barring only their
personal weapons. Unhurt they left Villers-Bocage.

After the battle, Wittmann (middle)
with left Josef 'Sepp' Dietrich
and right Hermann Weiser near Villers-Bocage.
In the short time Wittmann and his Tiger were ‘strolling’ in and around
Villers-Bocage the score was huge:
At ‘Point 213’ : 1 Cromwell IV and a Sherman Firefly (A Squadron, 4th CLY)
Route D 675 near Villers-Bocage: 8 Half-tracks, 4 Carriers and 2 6-pounder anti-tank
guns (A Company, 1st Rifle Brigade)
Border Villers-Bocage: 3 M3A3 Stuart V, 1 Half-track, 4 Cromwell IV, 1 Scout Car and
1 Carrier (RHQ Troop en Reconnaissance Troop)
Centre Villers-Bocage: 1 Sherman OP and 1 Cromwell OP (5th RHA)

The entrance to Château d’Orbois,
headquarters of the Panzer Lehr
Division
(the castle is nearly invisible from the road)
Wittmann headed for the headquarters of Panzer Lehr
Division, in Château d’Orbois, some six kilometres north of Villers-Bocage. After
briefing Wittmann took a ride back to 'Point 213'.
When Wittmann returned at 'Point 213' he heart that his two other Tigers,
the ‘221’ from SS-Ustuf. Georg Hantusch and the ‘233’ from SS-Oscha. Jürgen Brandt,
had done their duty. Their score was considerably lower, just two Cromwell tanks.
But they held seven Cromwells and two Sherman Fireflies from A Company, 4th CLY, at
'Point 213' under their guns. The crews of the British vehicles had taken cover in
the ditches and in the bushes.
Besides the seven regular Cromwells of the 4th CLY, there was also a 5th RHA Cromwell
OP (T187796) tank. From the 1st Rifle Brigade there were only 10 to 15 soldiers and a group
of officers that were collected just before Wittmann started his attack. Besides the three
Half Tracks stuck on ‘Point 213’ were three Scout Cars among the one from 4th CLY commander,
Lt-Col Lord Cranley. Cranley spoke with Major Wright, commander of A Company, to look at the
options. There was not much to do then to put the tanks in a position so they could cover the
troops on the hill. It was waiting for relieve troops from 131st Infantry Brigade.
The first infantry that reached 'Point 213' were not British, but German pantzergrenadiers
from Schwere SS-Panzer-Abteilung 101. The British soldiers, outnumbered, were fast overrun.
Around 11.00 hours, no more radio signal was received from A Squadron from ‘Point 213’. A
good collection of tanks and vehicles were fallen undamaged into German hands.
Meanwhile at 'Point 213', 1. Kompanie Schwere Panzer-Abteilung 101 under command of
SS-Hauptsturmführer Rolf Möbius had arrived with eight Tiger tanks, ready to move into Villers-Bocage.
Meanwhile, a part of Panzer Lehr Division under command of Gen.-Lt. Bayerlein was heading
for Villers-Bocage. Major Helmut Ritgen had collected 15 PzKpfw IV. When this unit approached
Villers-Bocage from the north, it was fired upon and stopped by anti-tank guns. Panzer Lehr
and the 1./s.SS-Pz.Abt. 101 headed from the north and north east with support of panzergrenadiers
and Waffen-SS. From the south some vehicles from 2. Panzer Division were rolling into Villers-Bocage.

German tanks out of action in Villers-Bocage
The street fighting in Villers-Bocage was fruitful for the British, six Tigers
and (probably) three PzKpfw IV. Around 16.00 hours the British troops still held
out in Villers-Bocage. But German mortar and artillery fire was descending in a
heavy quantity and drove the British slowly out of town and to the west. At the
train station A Company was over run and a complete platoon was taken prisoner.
Also the headquarters of 1st/7th Queen’s was almost surrounded.
Brigadier Hinde ordered the 22nd Armoured Brigade to retreat out of Villers-Bocage
and move to a better position than in the narrow streets of the town. Under a
smokescreen and a barrage of artillery from K Battery, 5th Royal Horse Artillery,
the British troops retreated a couple of kilometres west of Villers-Bocage, into
the so called ‘Island Position’.
The losses were high for the 7th Armoured Division. It lost 378 men,
killed, wounded or taken prisoner. Beside the human losses, a lot of material was
lost. The 22nd Armoured Brigade lost 20 Cromwell tanks, 4 Sherman Fireflies and 3
M3A3 Stuart tanks. Further more, 28 other vehicles were lost, like Half tracks,
Universal Carriers, Scout Cars etc. of the reconnaissance units.
Return to the bio on Michael Wittmann
CLICK HERE
BACK
|
